Elevator Button Replacement Guide for Property Managers

Professional Guide to Elevator Button Replacement for Property Managers
Elevator buttons are high-traffic components that experience constant use in residential, commercial, and industrial buildings. Over time, they can become unresponsive, cracked, faded, or lose illumination due to wear and electrical issues. Proper elevator button replacement requires careful handling, the right tools, and strict safety procedures to avoid damage to the control panel or internal wiring.
A systematic approach ensures the new button functions correctly and maintains the elevator’s reliability. This guide explains the step-by-step process for safely and correctly replacing an elevator button.
Complete Instructions for Elevator Button Replacement
Elevator buttons experience constant use, making them prone to damage and malfunction over time. A faulty lift button can disrupt daily operations, inconvenience occupants, and raise safety concerns. Proper lift button replacement requires a structured, step-by-step approach to ensure safe removal, accurate wiring, and secure installation.
Following correct electrical safety procedures helps prevent short circuits and panel damage. When done professionally, the replacement process restores smooth elevator performance, improves reliability, and minimises downtime in both residential and commercial buildings.
1. Inspect and Confirm the Fault
Before starting any replacement, carefully identify the exact issue. Press the button multiple times to check responsiveness and observe its behaviour. A button that does not light up, feels stuck, responds intermittently, or remains loose may indicate internal wear or electrical failure.
- Check for physical cracks or surface damage
- Confirm if the illumination is working
- Test surrounding buttons for comparison
- Ensure the issue is not part of a larger control panel fault
- Listen for unusual clicking sounds when pressed
- Check if the problem occurs consistently or intermittently
Accurate diagnosis prevents unnecessary removal of functioning components and helps determine whether the issue is mechanical or electrical.
2. Gather the Required Tools and Replacement Parts
Having the correct tools ready ensures a smooth and efficient replacement process. Using improper tools may damage the panel, wiring, or surrounding components.
- Screwdrivers (flathead and Phillips)
- Voltage tester or multimeter
- Insulated gloves
- Replacement button compatible with the elevator model
- Small container for screws and fasteners
- Flashlight for better visibility inside the panel
Always verify that the replacement button matches the voltage rating, mounting type, and illumination configuration of the existing system. Using incompatible parts may cause malfunction or safety hazards.
3. Turn Off the Elevator Power Supply
Safety is critical when working with electrical systems. Disconnect the elevator’s power supply before opening the control panel.
- Switch off the main power at the control cabinet
- Follow lockout/tagout procedures if required
- Use a voltage tester to confirm power is off
- Inform building management or occupants about the temporary service interruption
- Place warning signage near the elevator entrance
Never attempt to replace elevator components while the system is energised. Electrical shock risks and accidental short circuits can lead to serious injury or equipment damage.
4. Access the Control Panel
Carefully remove the elevator control panel cover to reach internal components.
- Unscrew mounting screws gently
- Support the panel while removing it
- Avoid pulling forcefully on attached wiring
- Place screws safely aside
- Work slowly to prevent scratching stainless steel surfaces
Handle the panel carefully to prevent cosmetic damage or accidental wire disconnections that may create additional issues.
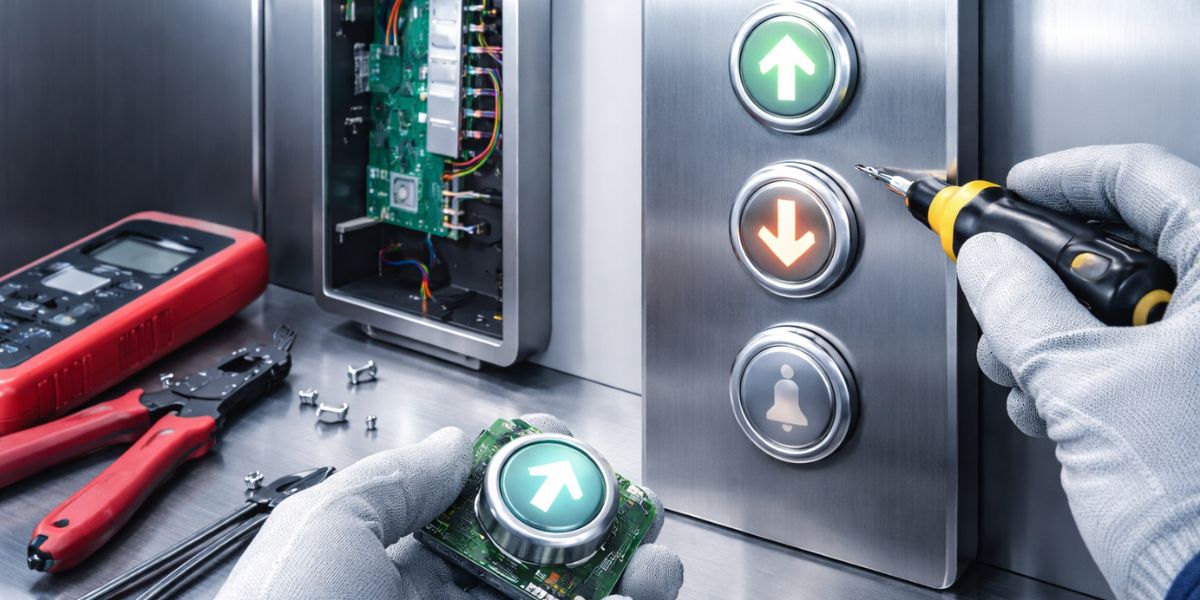
5. Locate and Identify the Faulty Button Assembly
Once the panel is open, locate the rear side of the faulty button. Elevator buttons are typically secured using clips, brackets, or threaded mounts.
- Identify the wiring connected to the button
- Observe connector types (plug-in or screw terminals)
- Take a photo for reference before disconnecting
- Check the condition of the mounting bracket
- Confirm label alignment for floor identification
This step ensures accurate reinstallation and prevents wiring errors during reassembly.
6. Disconnect the Electrical Wiring
Carefully detach the wires connected to the damaged button.
- Gently unplug connectors or loosen terminal screws
- Avoid pulling directly on wires
- Keep wires separated to prevent confusion
- Inspect wires for damage or corrosion
- Replace worn connectors if necessary
Proper handling prevents short circuits, loose connections, or future operational failures.
7. Remove the Faulty Button
After disconnecting the wiring, remove the defective button from the panel.
- Release retaining clips or unscrew mounting hardware
- Push the button out from the back if required
- Check the panel opening for debris or damage
- Clean the mounting area before installing the new button
- Inspect surrounding buttons for wear
Ensuring a clean and stable surface allows the new button to sit properly and function smoothly.
8. Install the New Elevator Button
Insert the replacement button securely into the panel opening.
- Align it correctly with the panel cutout
- Fasten clips or mounting screws tightly
- Ensure the button sits flush with the panel surface
- Avoid over-tightening, which may crack the panel
- Confirm label orientation matches other buttons
Proper alignment ensures smooth operation, consistent illumination, and a professional appearance.
9. Reconnect the Wiring
Reconnect the wires according to your earlier reference.
- Attach connectors firmly
- Tighten terminal screws securely
- Double-check wiring positions
- Ensure no exposed wires are touching metal surfaces
- Confirm polarity if applicable
Correct wiring is essential for accurate signal transmission and reliable elevator operation.
10. Restore Power and Test the Button
After reassembling the panel, restore the power supply and thoroughly test the newly installed button.
- Check if the button illuminates properly
- Press it multiple times to confirm responsiveness
- Verify that the elevator responds to the selected floor
- Test nearby buttons to ensure no disruption occurred
- Observe the operation during one complete travel cycle
Once testing is successful, secure the panel completely. Conduct a final inspection to confirm stability, alignment, and consistent performance. Document the replacement for maintenance records, including date, button type, and observations. Proper documentation supports preventive maintenance planning and future troubleshooting.
Ensuring Long-Term Performance After Elevator Button Replacement
Completing a button replacement is not just about restoring functionality; it ensures the overall reliability and safety of your elevator system. After installation and testing, property managers should source high-quality elevator parts from trusted vendors to guarantee durability and consistent performance. Low-quality components can cause repeated failures, increased maintenance costs, and tenant dissatisfaction.
Working with reliable elevator spare parts suppliers in Dubai ensures that replacement components meet industry standards and are fully compatible with your system. Trusted providers like Elevator Mart offer dependable solutions suitable for residential, commercial, and hospitality properties.